
This guide walks through every task required to stand up a continuous integration build pipeline for a Dynamics 365 Finance and Operations codebase in Azure DevOps. By the end you will have a pipeline that compiles your X++ models, stamps the build number into every model descriptor, and publishes a deployable package as a versioned artefact — ready for the release pipeline covered in Part 2.
Both source control approaches are covered side by side: Team Foundation Version Control (TFVC), which remains the default for many established F&O teams, and Git, which Microsoft now recommends for new projects. The pipeline tasks downstream are identical regardless of which you choose.
If you have not yet provisioned a developer environment, start with our companion guide first: How to Set Up a Unified Development Environment (UDE) for Dynamics 365 Finance & Operations.
Many F&O teams still package code on a developer's local machine — open Visual Studio, right-click the model, hit Create Deployable Package. That works for a solo developer on a single branch, but it falls apart the moment you add a second developer, a second environment, or an auditor asking which commit produced the package running in production.
Every build runs on a clean agent, with the same NuGet packages, the same MSBuild arguments, the same platform and application versions. The .zip produced at build 247 can be regenerated from the same commit hash at any point in the future without relying on a developer's local machine state.
Every pipeline run records who triggered it, which commit was built, which platform and application versions were used, how long it took, and what artefacts it produced. When a deployment issue is traced back to a specific build, the pipeline run is the single source of truth.
When two developers commit X++ changes to the same Metadata folder, the pipeline picks both up on the next continuous integration trigger and produces a single deployable package containing both changes. No more "who built last?" confusion.
Part 2 of this series — the release pipeline — depends on a clean, well-named, well-versioned input artefact. Without an automated build producing that artefact consistently, every release becomes a manual, error-prone exercise.
Sign in to your Azure DevOps organisation and open the project that holds your F&O codebase. The project landing page shows you the navigation rail on the left — Repos, Pipelines, and Project Settings are the three areas used in this guide.
Open Organization Settings then Agent pools to confirm at least one pool is available to this project. The Azure Pipelines pool is the Microsoft-hosted default and is sufficient for most F&O builds.
Service connections do not need to be configured at this stage. The build pipeline does not require any. They become relevant in Part 2 when the release pipeline deploys to an environment.
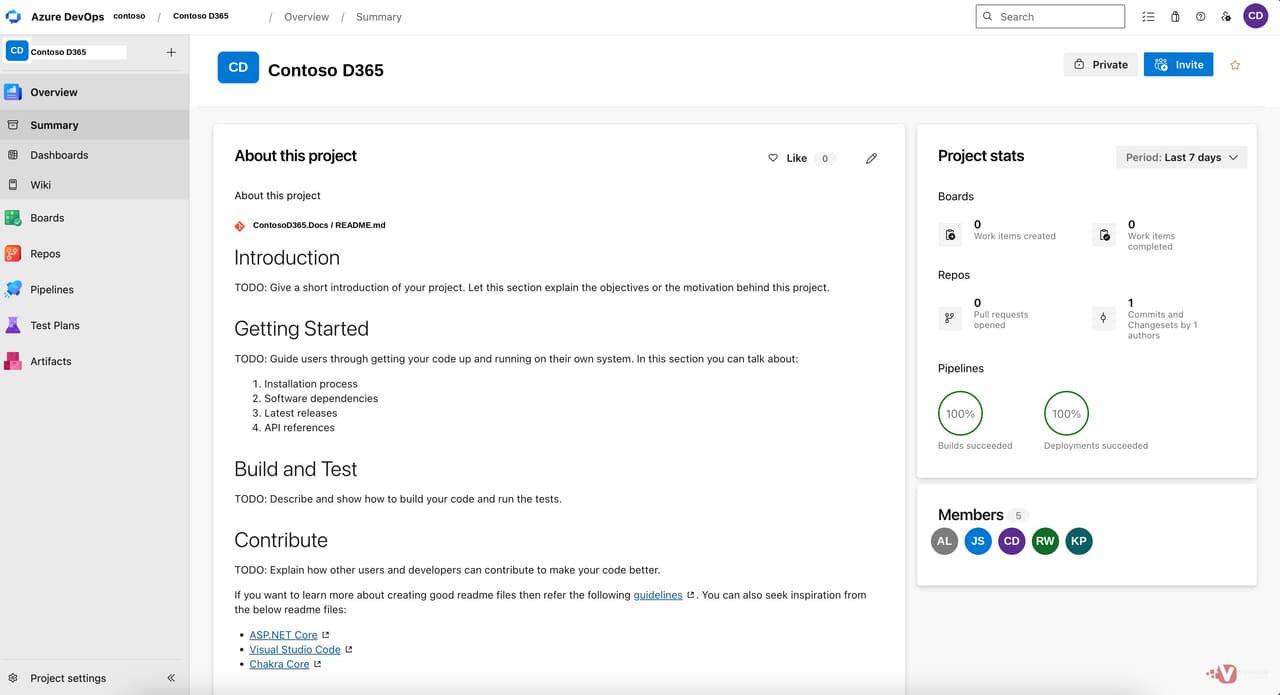 Figure 1: Azure DevOps project landing page — Repos, Pipelines, and Project Settings are the three areas used in this guide.
Finance and Operations developers typically use one of two source control systems. The pipeline tasks downstream are identical regardless of which you choose.
Team Foundation Version Control (TFVC) is hierarchical: branches such as Trunk, Dev, and SIT are represented as folders on the server. Inside each branch, the standard F&O layout applies — Metadata, Build, Projects, and NugetConfigs at the top level.
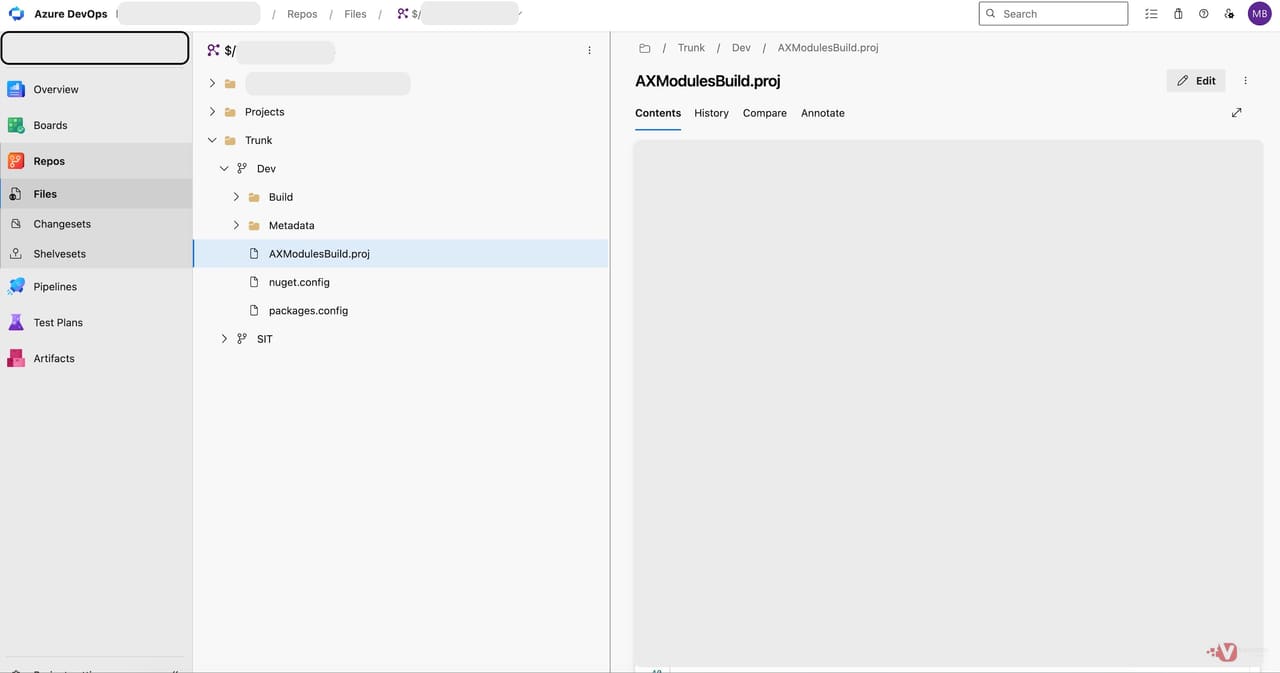 Figure 2: TFVC server-side branching structure — Trunk, Dev, and SIT branches as folders on the server.
Git uses true branches rather than folders. A fresh repository starts with a single main branch, and the team builds out its branching strategy from there. The folder layout inside each branch is identical to TFVC.
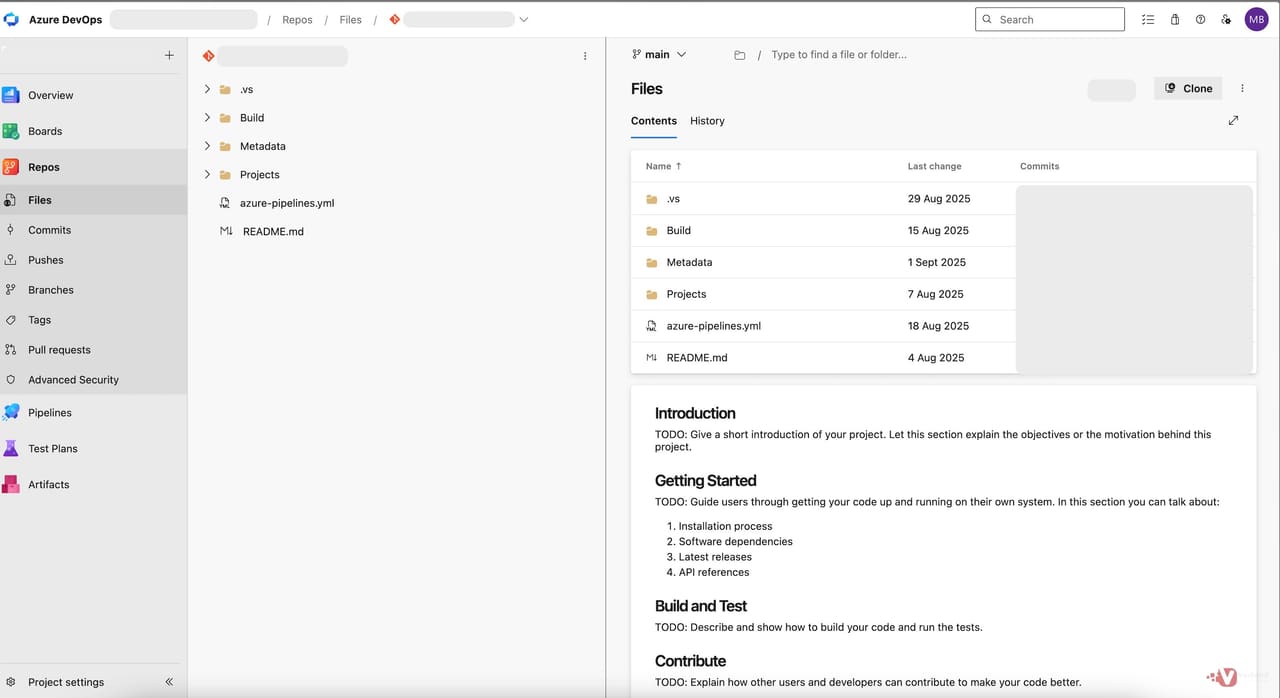 Figure 3: Git repository file view — identical folder layout to TFVC, different version-control model.
Which to pick? Microsoft's modern recommendation is Git, particularly for new projects. Mature teams already running on TFVC do not need to migrate solely for pipeline support — both work equally well with the build tasks covered in this guide.
From Pipelines, click New pipeline. Azure DevOps will steer you towards the YAML-based wizard by default. For F&O builds, the classic editor is significantly easier to learn from and debug.
Scroll to the bottom of the source selection page and click the small Use the classic editor link. From here, select your source — TFVC or Azure Repos Git — and pick the branch or folder to build from.
On the template selection screen, choose Empty Job at the top. This drops you onto a blank pipeline canvas with a single Agent job 1 already in place.
 Figure 4: The empty pipeline canvas after selecting Empty Job. The five tabs — Tasks, Variables, Triggers, Options, History — are where the rest of the configuration happens.
The first task on the canvas — Get sources — is added automatically based on the source you selected on the previous screen. For TFVC, it shows your repository root with workspace mappings; for Git, it shows the repository and branch.
Set Clean to true, and select Sources and output directory from the dropdown. This ensures every build starts from a fresh checkout, with no leftover binaries or cached metadata from a previous run.
Leave Label sources turned off unless your team uses TFVC labels for traceability — most do not, and the pipeline run number plus the Update Model Version task in Step 6 provide all the traceability you need.
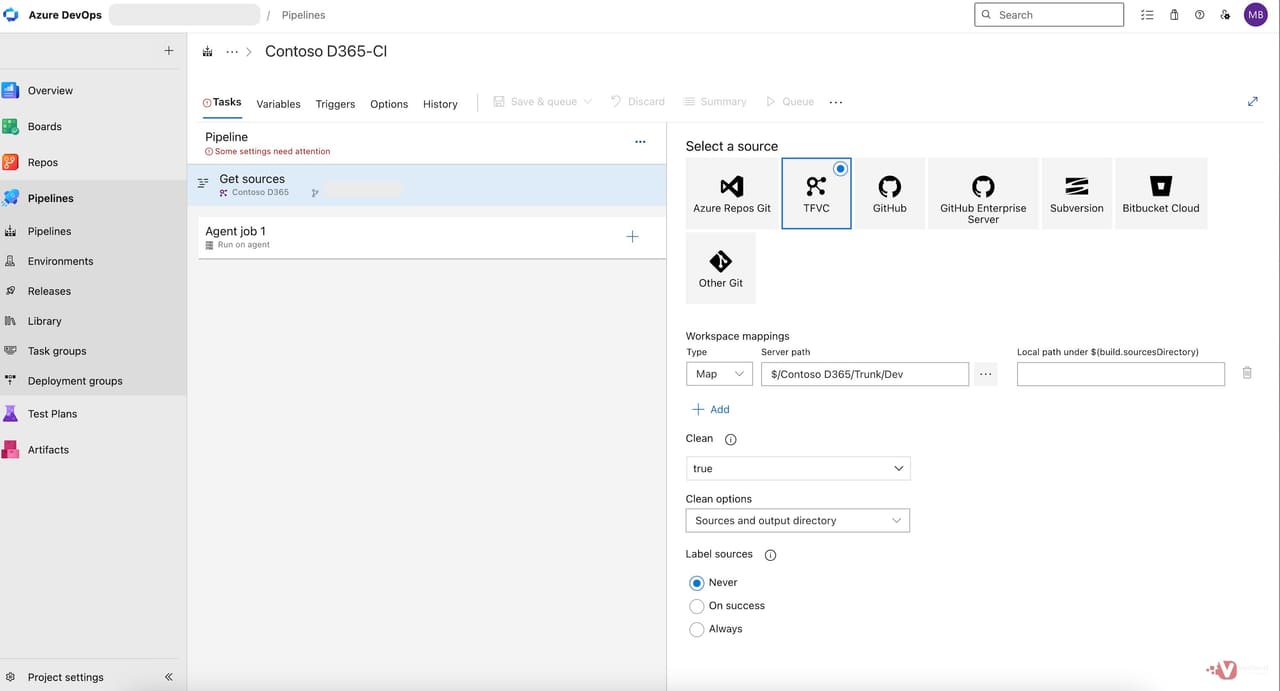 Figure 5: Get sources task configured with Clean enabled. Workspace mapping points at the Trunk/Dev folder for TFVC; for Git this section shows the repository and branch.
Click the plus button on Agent job 1, search for NuGet, and add the task. F&O builds do not use the standard NuGet restore command. They use the custom install command with specific arguments.
Set the Command to custom, and provide the following Command and arguments value:
install -NonInteractive $(NugetConfigsPath)\packages.config -ConfigFile $(NugetConfigsPath)\nuget.config -Verbosity Detailed -ExcludeVersion -OutputDirectory $(NugetsPath)
This instructs NuGet to install every package listed in your packages.config — including the four F&O packages: the platform compiler package, the platform metadata package, the application metadata package, and the application suite metadata package. Together these give the build agent everything it needs to compile X++ code.
The ExcludeVersion flag is important: it causes NuGet to install each package into a folder named after the package only, not package-and-version. This keeps the downstream MSBuild references stable across platform updates — you change the package version in packages.config, but the folder paths in your MSBuild arguments stay the same.
This is the most common point of failure in F&O build pipelines. If the NuGet restore fails, check that the NugetConfigsPath and NugetsPath variables (defined in Step 12) match the actual folder structure in your repository. Also confirm that the packages.config and nuget.config files are committed and up to date.
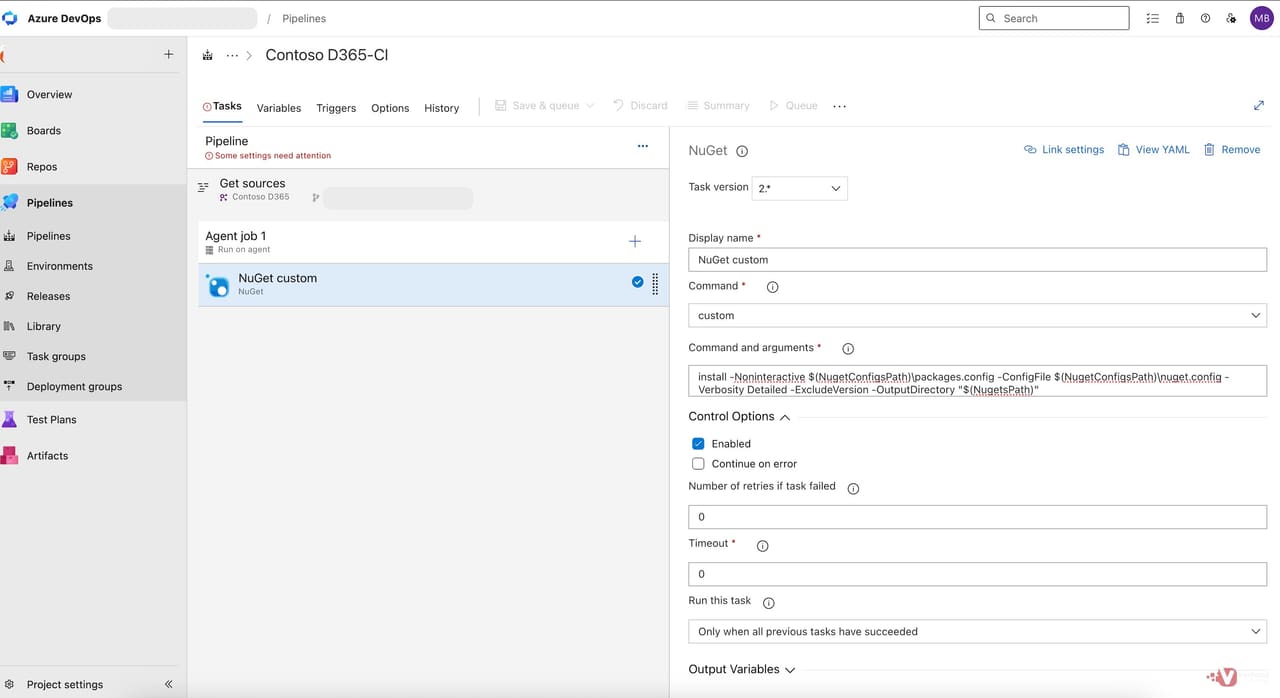 Figure 6: NuGet custom install task. The custom command with install arguments gives the agent the F&O build tools — standard NuGet restore is not sufficient.
Add an Update Model Version task. This task is provided by the Dynamics 365 Finance and Operations Tools extension from the Azure DevOps Marketplace; if it does not appear in the task list, install the extension first.
Configure the task as follows:
X++ Source Location: $(MetadataPath)
Descriptor Search Pattern: **\Descriptor\*.xml
Lowest Layer to Update: ISV (for ISV products) or CUS (for customer code)
Version Number: $(Build.BuildNumber)
The effect: on every successful build, every model descriptor in your codebase is stamped with the build's own number. When a model is later deployed to an environment, the version shown in the environment's model list traces directly back to the pipeline run that produced it.
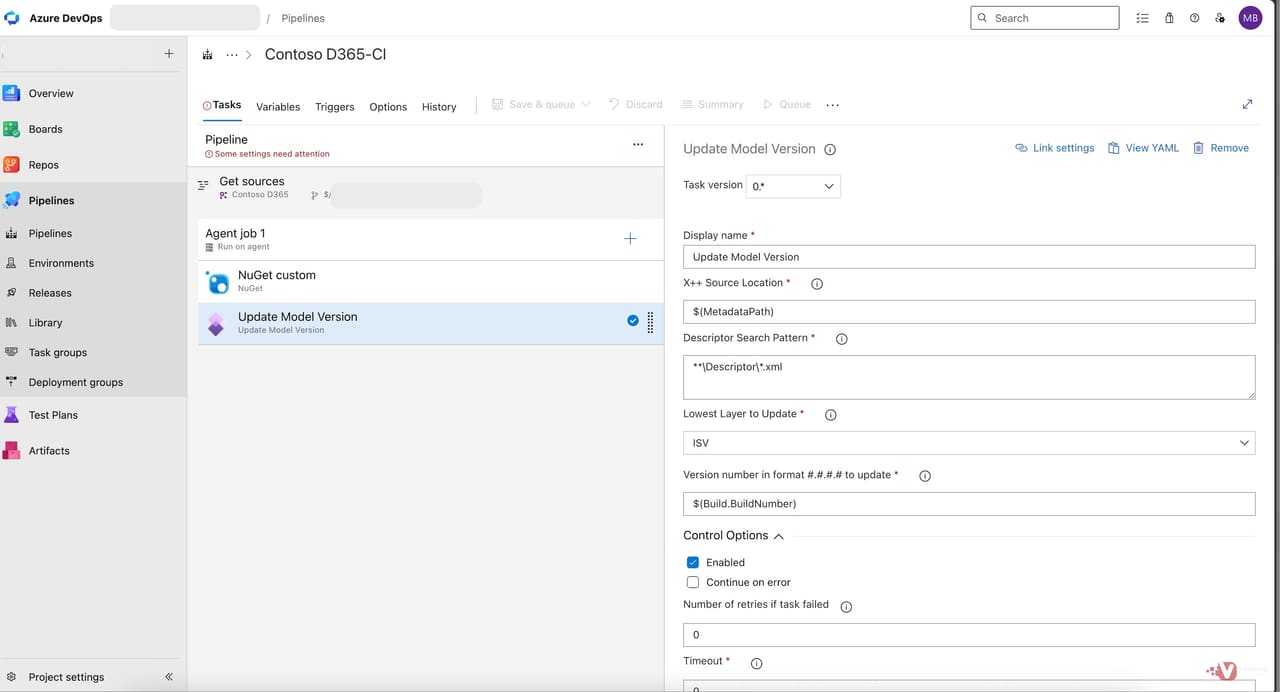 Figure 7: Update Model Version task — every model descriptor stamped with $(Build.BuildNumber) for downstream traceability.
Add a Visual Studio Build task. Set the Solution to **\*.sln to match any solution file under the source root, and the Visual Studio version to 2022.
The MSBuild Arguments line is where F&O build pipelines diverge most from standard .NET builds. You need to point MSBuild at the F&O metadata directory, the NuGet package locations for platform and application references, and the output directory for compiled binaries.
Output is written to $(Build.BinariesDirectory), a temporary folder referenced by the Create Deployable Package task in Step 10.
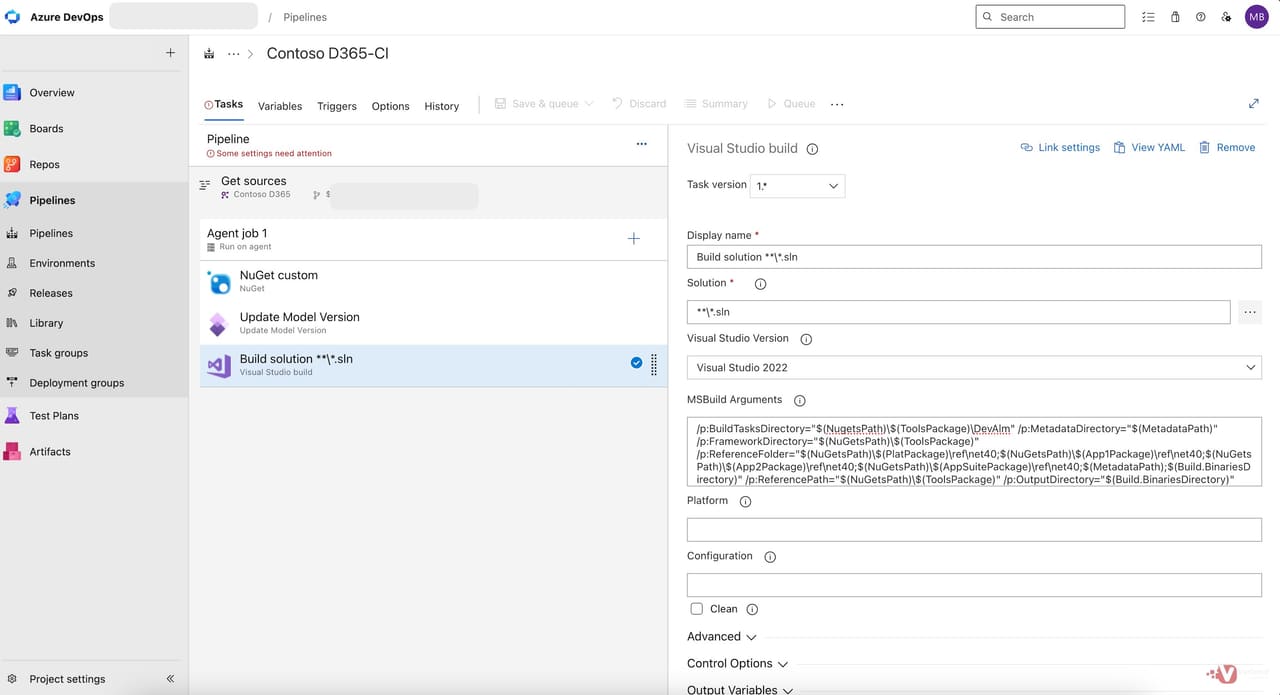 Figure 8: Visual Studio Build task — the MSBuild arguments wire MSBuild into the F&O NuGet package layout restored by the previous task.
Add a Copy Files task and name it Copy X++ Compile Log Files. The F&O compiler produces three log file types worth keeping around:
Set Source Folder to $(Build.SourcesDirectory), Target Folder to $(Build.ArtifactStagingDirectory)\Logs, and the Contents pattern to match all three log types.
These logs are published as part of the build artefact in Step 11. When a build fails or produces unexpected results, this is the first place you look.
 Figure 9: Copy Files task capturing xppc, labelc, and reportsc log files into the artefact staging directory.
Add a NuGet Tool Installer task to the pipeline. Set the Version field to 3.3.0. This makes NuGet available on the build agent so the next task can use it to bundle the deployable package correctly.
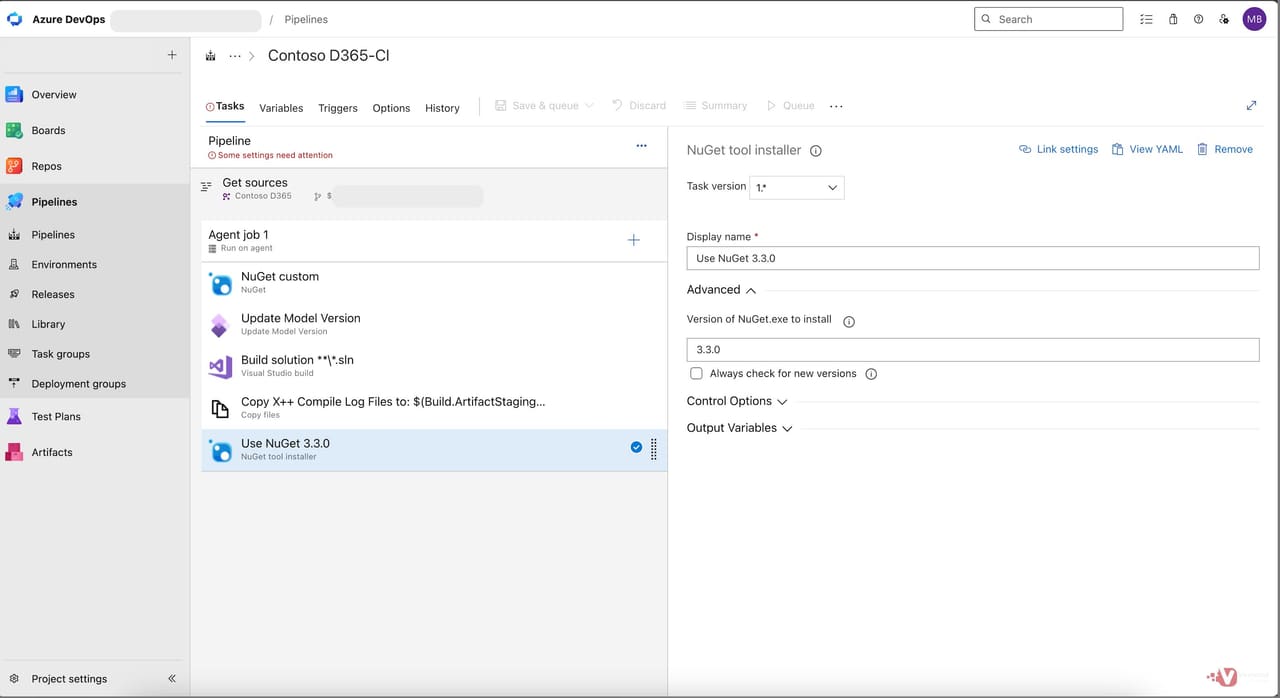 Figure 10: NuGet Tool Installer task set to version 3.3.0.
Add a Create Deployable Package task. This is the task that bundles the compiled X++ binaries with the metadata and dependencies into a single .zip file — the primary output of the entire pipeline.
Configure the following fields:
X++ Tools Path: $(NuGetsPath)\$(ToolsPackage)
Location of the X++ binaries to package: $(Build.BinariesDirectory)
Package Platform Version: match your target environment exactly — for example, 7.0.7367.49
Package Application Version: match your target environment exactly — for example, 10.0.2015.54
Path for the cloud deployable package: $(Build.ArtifactStagingDirectory)\CloudDeployablePackage
The Platform Version and Application Version values are critical. They are stamped into the deployable package metadata and validated by the target environment during deployment. A mismatch between the package version and the environment version causes deployment failures.
Tick Create Lifecycle Services Software Deployable Package. Even though we are not deploying via LCS in the UDE/PPAC world, this checkbox controls whether the task produces the standard .zip format that downstream tools expect.
The Platform Version and Application Version must match your target environment exactly. You can find these values in the Power Platform Admin Center under your environment's Dynamics 365 apps — look at the Finance and Operations Provisioning App version. When your target environment is upgraded, update these values in the pipeline variables immediately.
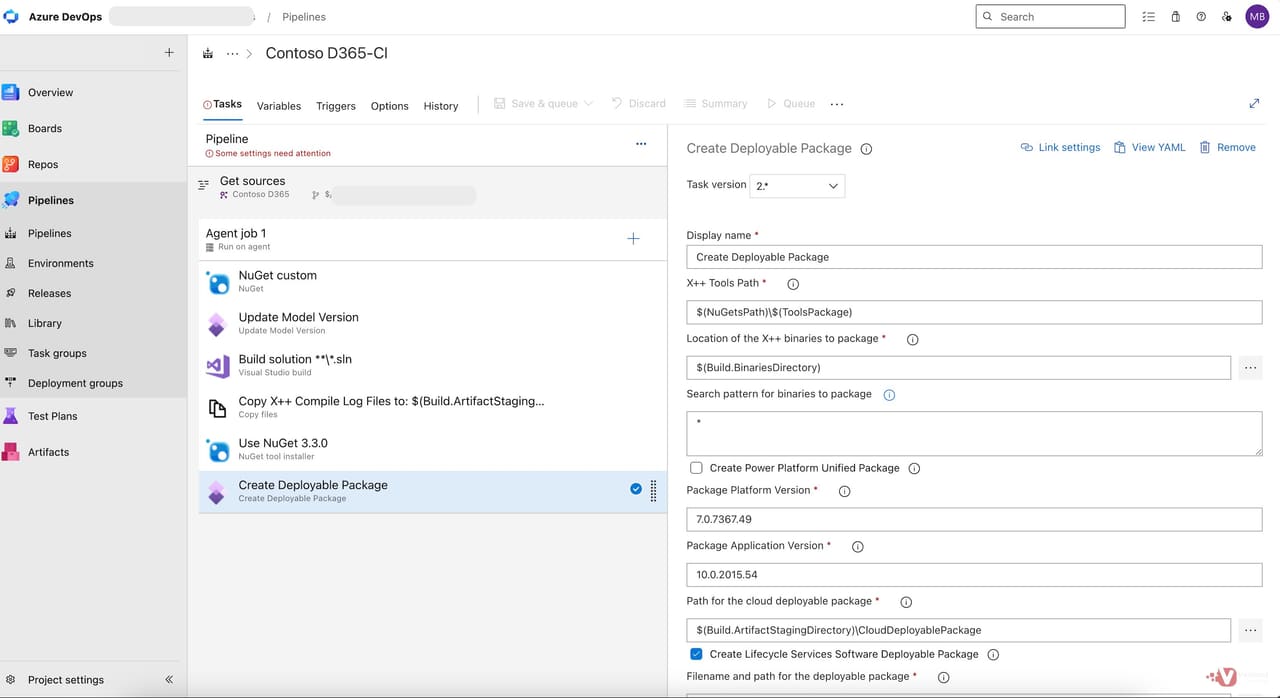 Figure 11: Create Deployable Package task — Platform and Application Version must match the target environment exactly.
Add a Publish build artifacts task as the final task on the canvas. This takes everything in $(Build.ArtifactStagingDirectory) — the deployable package .zip, the CloudDeployablePackage folder, and the compile logs — and attaches them to the pipeline run as a downloadable artefact.
Set Path to publish to $(Build.ArtifactStagingDirectory), Artifact name to drop, and Artifact publish location to Azure Pipelines (the default).
Once the build completes, this drop artefact is what the release pipeline in Part 2 will reference as its input.
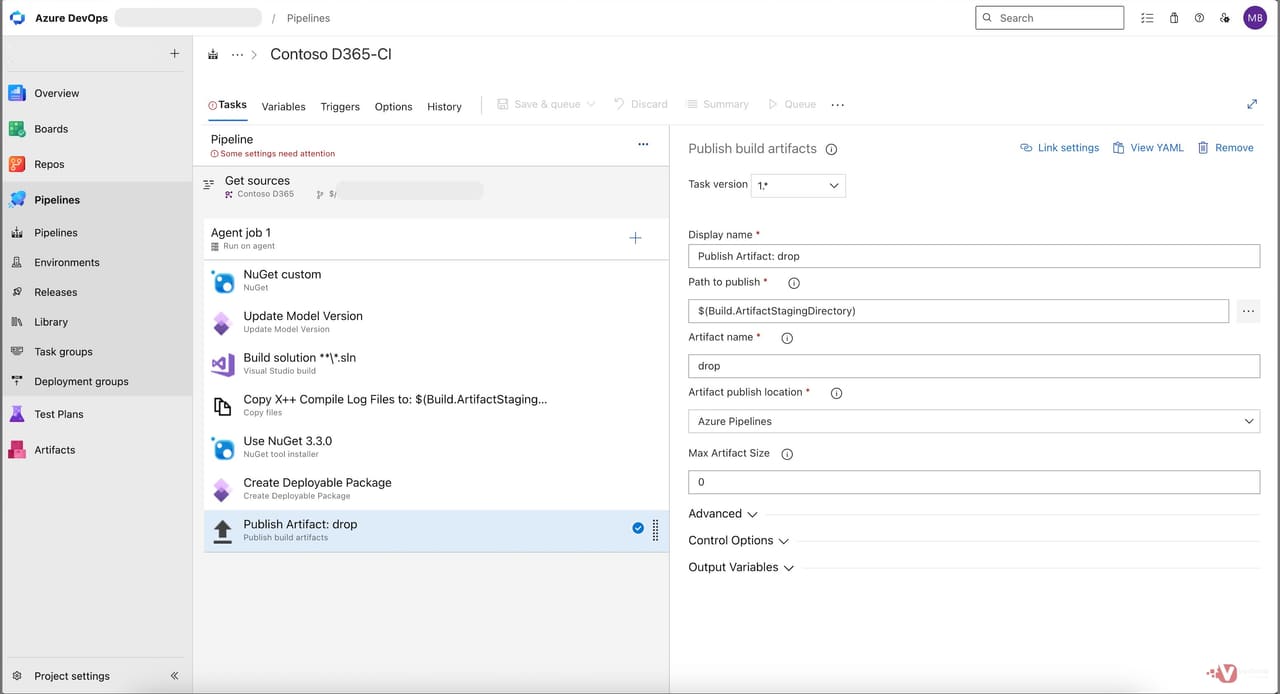 Figure 12: Publish build artifacts task — the deployable package and supporting files are published as the drop artefact.
Switch to the Variables tab. Every $(...) reference used in the tasks above is resolved against this tab. Define each of the following:
App1Package, App2Package, AppSuitePackage — the F&O application NuGet package folder names. These change with each major platform release.
PlatPackage, ToolsPackage — the F&O platform NuGet package folder names. Again, these change with platform versions.
MetadataPath — the relative path from the source root to your Metadata folder. For TFVC it is typically Trunk/Dev/Metadata; for Git it is simply Metadata.
NugetConfigsPath, NugetsPath — the paths under the source root where your packages.config / nuget.config live, and where the NuGet task should write the downloaded packages.
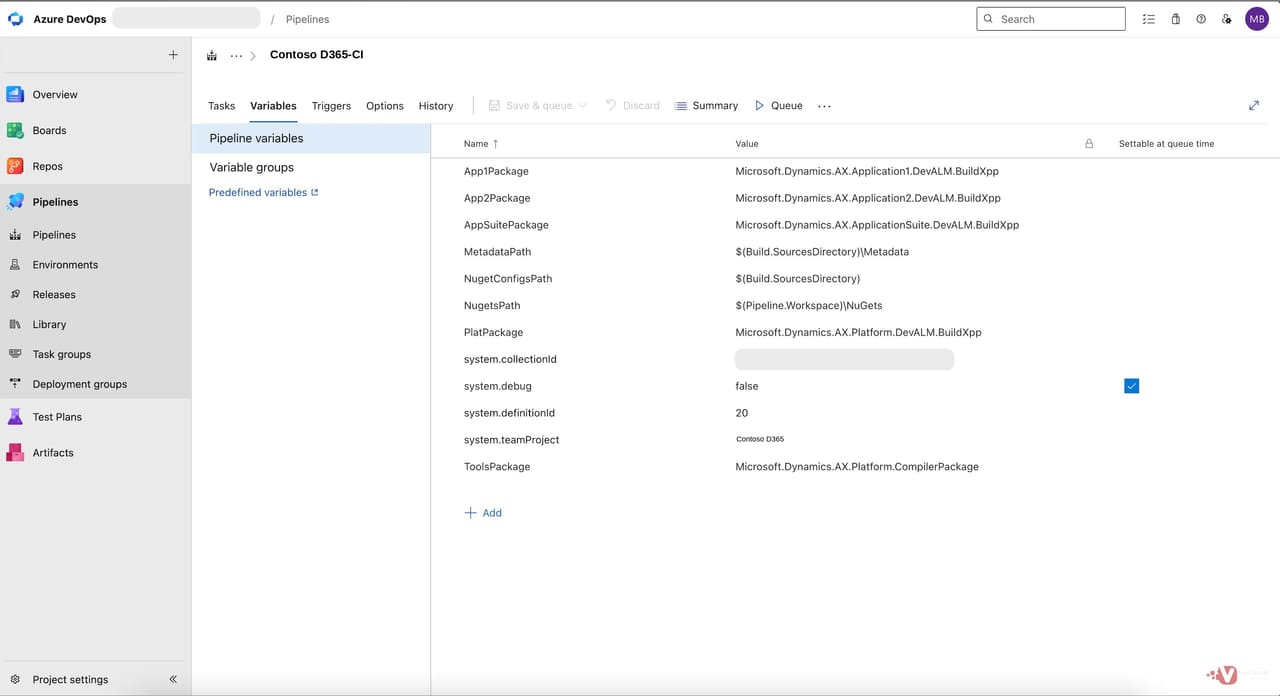 Figure 13: Variables tab — F&O NuGet package folder names and metadata paths centralised so they can be updated in one place.
Switch to the Triggers tab. Tick Enable continuous integration. Tick Batch changes while a build is in progress — this is important. Without it, three rapid commits trigger three separate builds; with batching enabled, the second and third commits are rolled into a single build run, saving agent time and producing one clean artefact.
Add a path filter scoped to your Metadata folder. This is a small but valuable optimisation: every documentation tweak, README update, or pipeline-configuration change that does not touch the X++ Metadata folder skips the build entirely.
 Figure 14: Triggers tab — CI enabled with batching, path filter scoped to the Metadata folder.
Click Save & queue. Pick a branch, add a queue comment if you like, and click Save and run. The pipeline begins executing immediately.
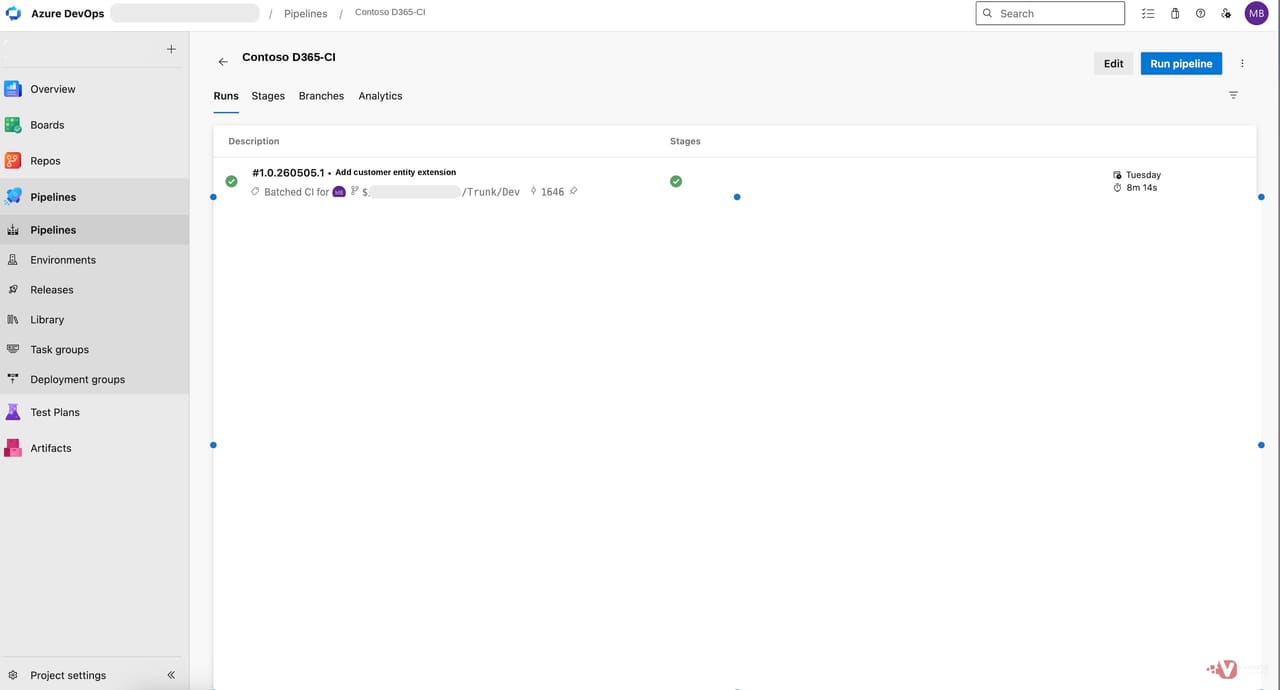 Figure 15: Runs list — a successful first run of the build pipeline.
Click into the run to see the detailed view. You will see the Compile X++ job listed below the summary, with each task showing its individual execution time and status. Green checkmarks across all tasks confirm a clean build.
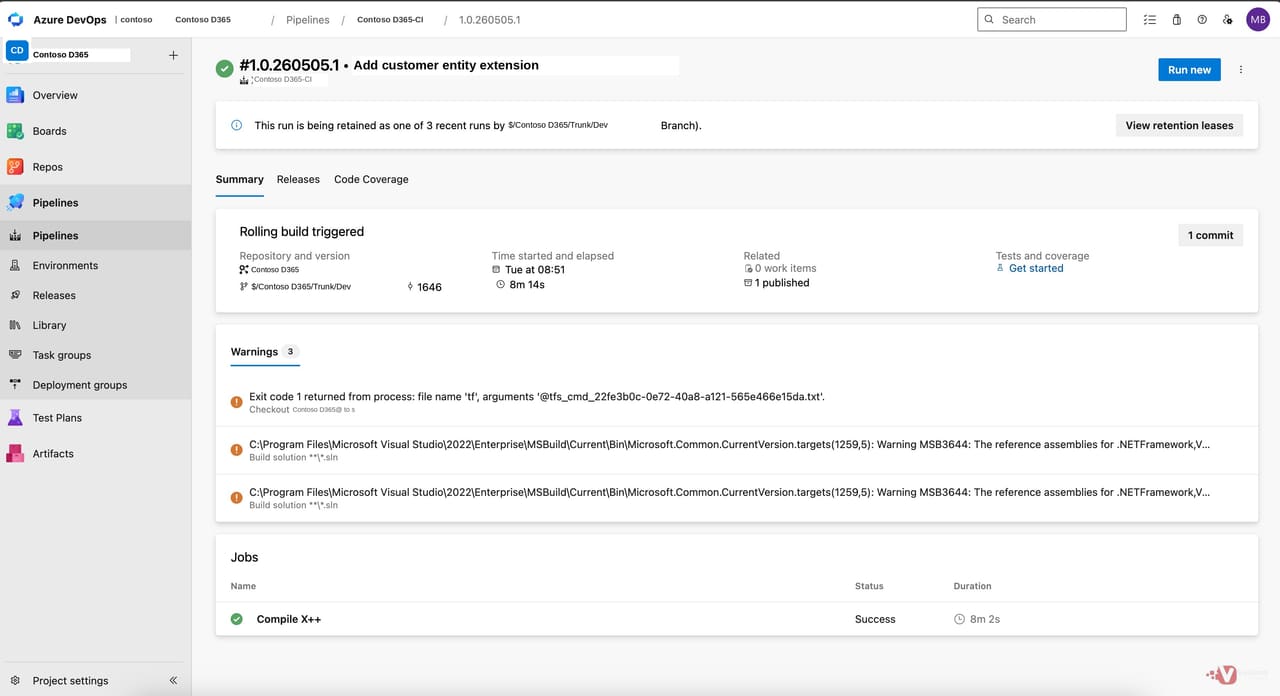 Figure 16: Run detail page — build succeeded with all tasks completed and one published artefact attached.
Click the 1 published link in the Related box to open the artefacts view. Drill into the drop artefact and you will see the published structure. The headline file is AXDeployableRuntime_[build-number].zip — this is the deployable package that the release pipeline in Part 2 will pick up.
Alongside the .zip, you will see the CloudDeployablePackage folder — the same package in the format Power Platform pipelines expect for PPAC deployments — and the Logs folder containing the xppc, labelc, and reportsc compiler output.
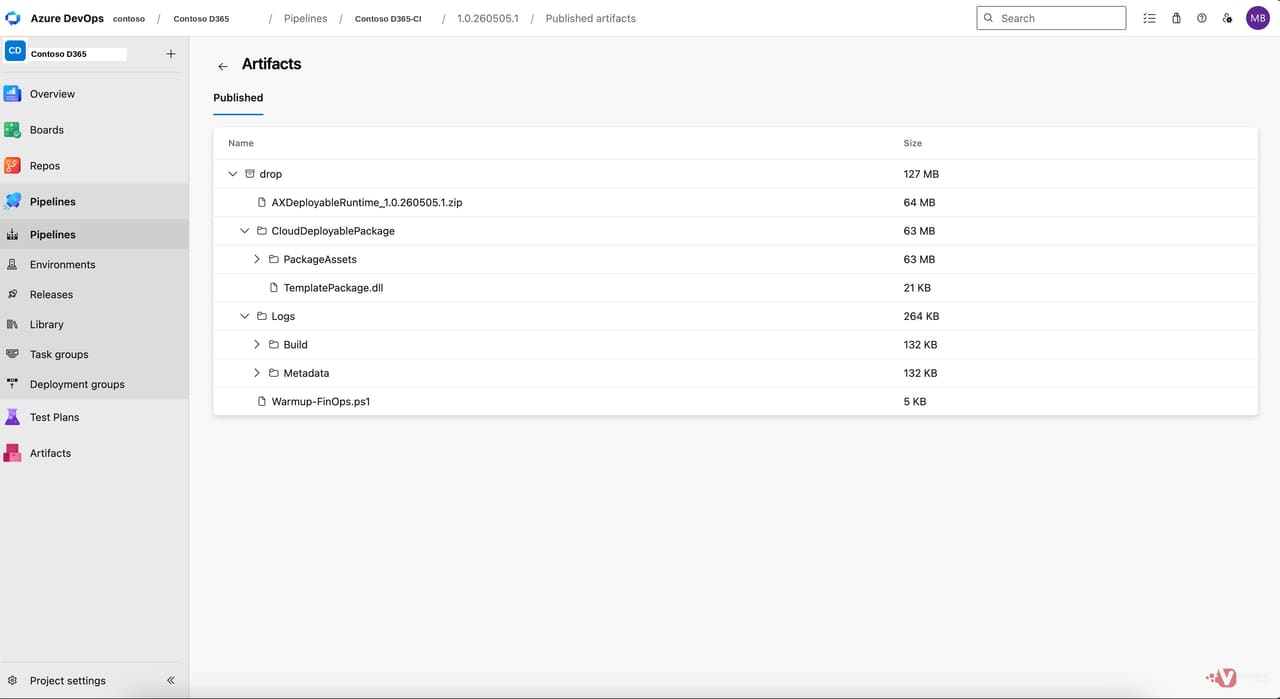 Figure 17: Published drop artefact — AXDeployableRuntime_[build-number].zip is the deliverable. CloudDeployablePackage is the equivalent for PPAC; Logs contains compiler output.
With the build pipeline running and producing a verified deployable package, the foundation is in place. Here are the next things to do, in order:
Commit a small X++ change and watch the CI trigger fire — confirm the pipeline runs end-to-end on a genuine commit, not just a manual queue, and that the path filter correctly ignores non-Metadata changes.
Update Platform and Application Versions when your target environment is upgraded — these two values on the Create Deployable Package task and the corresponding NuGet package folder names in Variables must stay aligned with the environment you are deploying to.
Document your pipeline variables for your team — particularly the package folder names, which change with every F&O major release and are easy to forget when upgrading.
Move on to Part 2 — The Release Pipeline — where we take the .zip produced here and walk through deploying it automatically to a UDE environment and a downstream sandbox via Power Platform pipelines.
Our ex-Microsoft consultants configure end-to-end ALM pipelines, automate deployable package creation, and get your D365 F&O team shipping X++ code with confidence.
Or call us directly: 01625 569 777