This tutorial walks through the complete backup and restore workflow for a Unified Developer Experience (UDE) sandbox environment in the Power Platform Admin Center. By the end you will know how to create a labelled manual backup before risky work, restore from any backup via the Backup retention panel, and recover to a thirty-minute system snapshot using point-in-time restore.
The walkthrough uses the same fictional UDE — Contoso D365 Dev — that we worked with in Part 1, so the environment naming should look familiar.
If you have not yet read Part 1, start there for the refresh workflow that complements this one: How to Refresh and Copy a UDE Sandbox Environment for D365 F&O. And if you have not yet provisioned a UDE, see How to Set Up a Unified Development Environment (UDE) for D365 F&O.
A UDE without a working backup is a UDE you are afraid to touch. The moment a risky migration, a fragile extension test, or a "let me just try this in Dev" experiment happens, every developer's instinct should be to take a snapshot first — and to know the restore path that brings the environment back. Power Platform gives you both manual and system backups; the discipline is using them.
A labelled manual backup before a destructive operation — a data migration, a model deployment, a tenant cutover — costs ten seconds and buys an immediate rollback if anything goes wrong. The discipline of taking the snapshot is far cheaper than the recovery exercise of rebuilding from source control after a bad change.
Sometimes things go wrong without warning. A bad commit, a corrupted data import, an integration that posted three thousand wrong journal entries — these are the moments where the automatic thirty-minute system backups earn their place. Point-in-time restore brings the environment back to the most recent good state without any preparation on your part.
A backup from one UDE can be restored to a different compatible target. This is useful for promoting a known-good developer state to a teammate's environment, for cloning a clean baseline to a test sandbox, or for branching off an experimental UDE without touching the original.
Production Finance and Operations data is not optional. A team that runs only on refresh-from-production has no rollback path if production itself is the problem. Combining manual backups (before known risky work), system backups (for unplanned failures), and a documented restore procedure is what turns the Power Platform safety net into a real disaster-recovery story.
Open the Power Platform Admin Center and navigate to your UDE environment's detail page. From the toolbar at the top, click Backup + Restore. A small dropdown menu opens with two options:
This is the single entry point for both backup and restore workflows. Everything else in this guide branches from here.
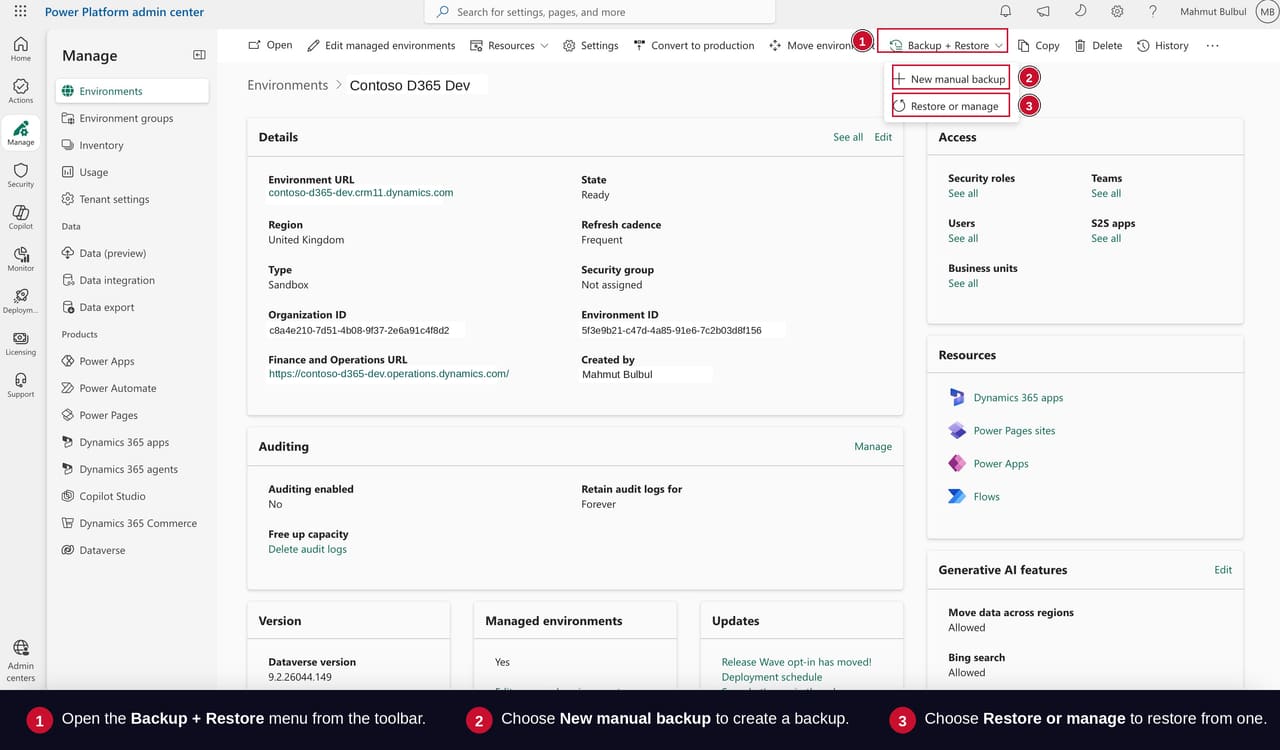 Figure 1: The Backup + Restore dropdown on the environment toolbar — New manual backup (1) and Restore or manage (2) are the two entry points.
Click New manual backup. A panel opens on the right with a single mandatory field: Label.
Use a label that lets you recognise the backup later in the list. Conventions that work well:
Avoid labels like "test" or "backup1" — six labels deep into a busy week they all look the same. Once you have entered the label, click Create.
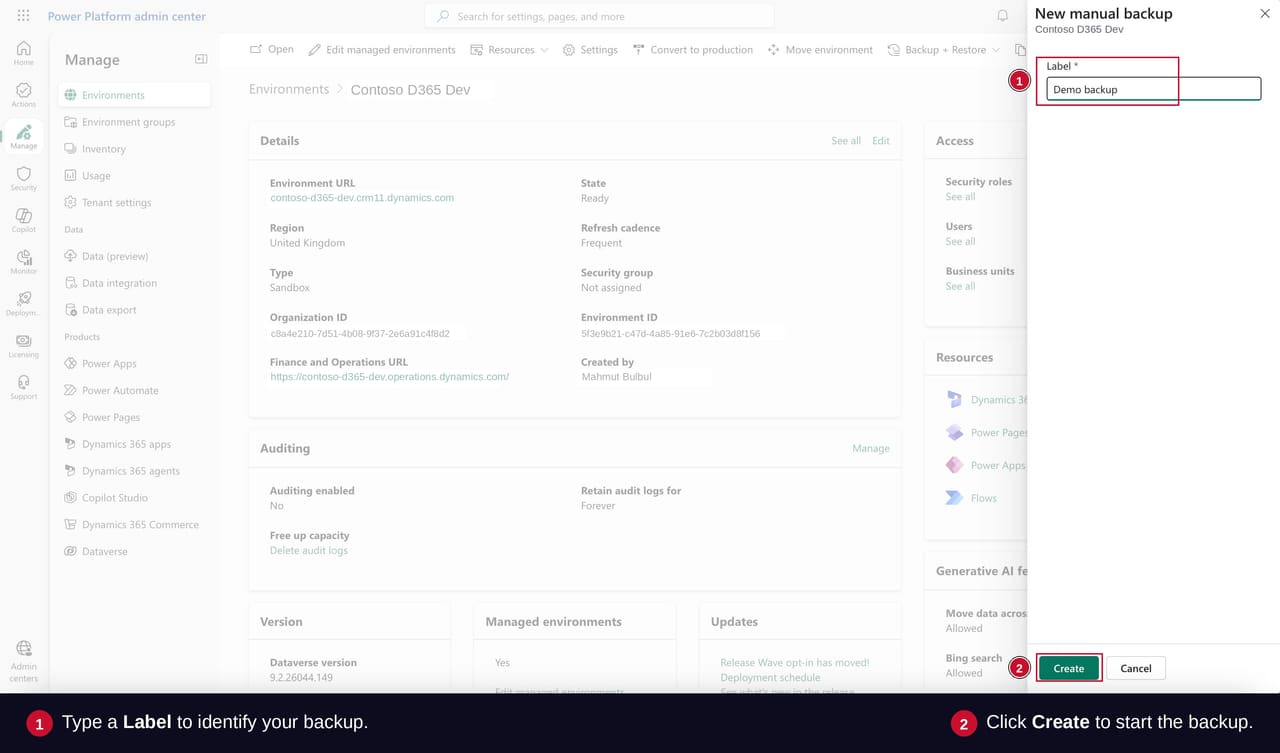 Figure 2: The New manual backup dialog. Label (1) is mandatory and the only configuration; Create (2) kicks off the snapshot.
After a few seconds, a green banner appears at the top of the environment page confirming the backup was successfully created. The banner includes a See your backups link.
Click See your backups to jump straight to the list. If you dismiss the banner before clicking it, you can reach the same page via Backup + Restore → Restore or manage in the toolbar.
Manual backups happen fast. Unlike a full Copy environment operation, which can take hours, a manual backup typically completes in well under a minute. This is what makes it cheap enough to take routinely before any risky operation.
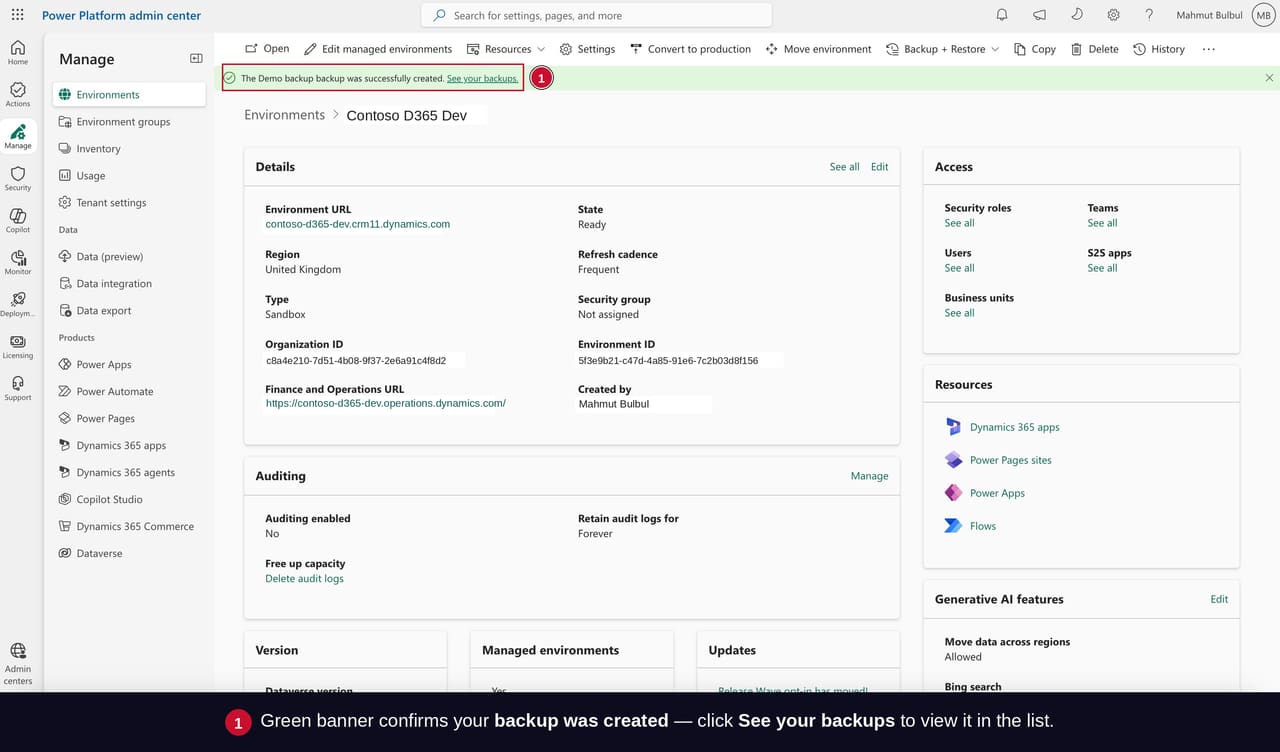 Figure 3: Success banner (1) confirming the backup was created. See your backups (2) jumps to the list.
The Backup + Restore list page has two tabs at the top: Manual and System. Manual is for the labelled backups you have created explicitly; System is for the automatic thirty-minute snapshots taken by Power Platform.
Switch to the Manual tab. Your new backup shows up with four columns:
To act on a backup, click the three-dots menu (…) next to the row.
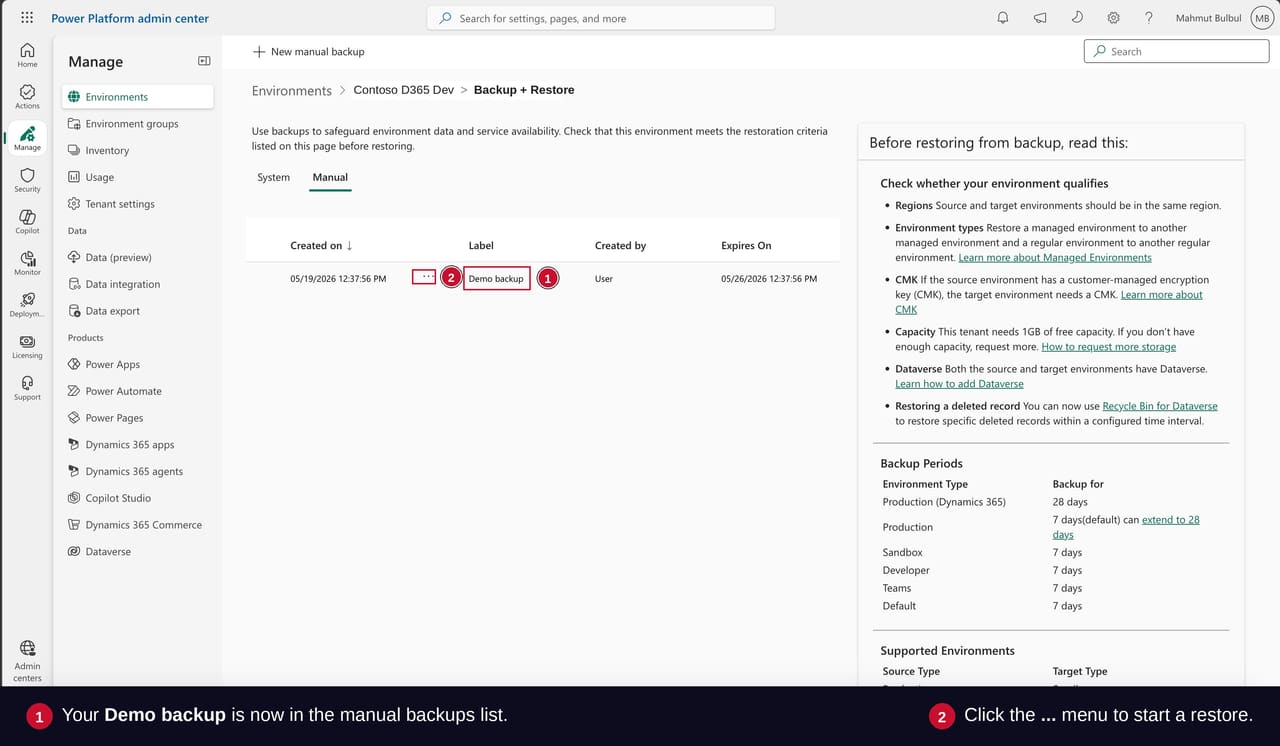 Figure 4: Manual backups list — your new backup (1) appears with timestamp, label, creator, and expiry. The three-dots menu (2) opens the Restore / Delete actions.
The three-dots menu opens with two options:
Click Restore to begin the restore workflow.
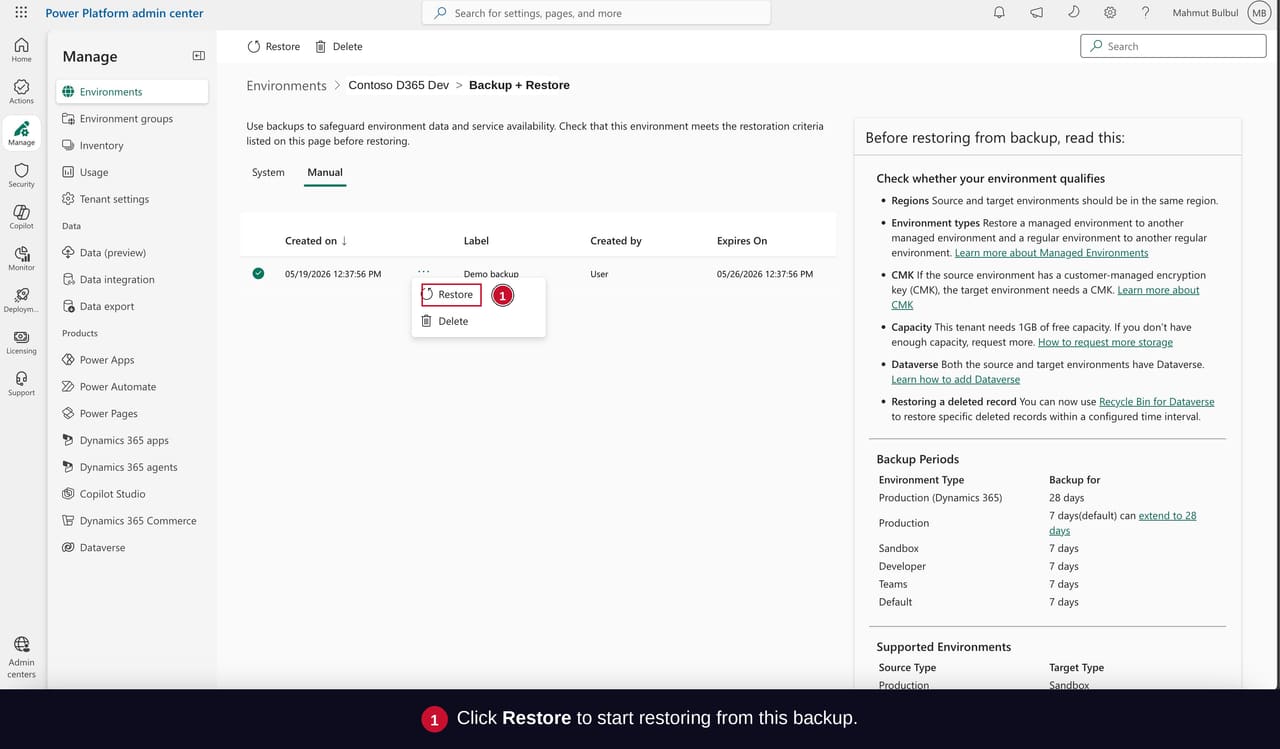 Figure 5: Context menu on the backup row — Restore (1) starts the restore workflow; Delete (2) removes the backup before expiry.
The Backup retention panel slides open on the right. The top of the panel shows the backup details so you can confirm you have selected the right one:
Below that — the important bit — is the Select target environment to overwrite dropdown. Only environments that meet the requirements for Backup + Restore (same tenant, sandbox type, Managed Environments enabled) appear in the list. Pick the target. Then click Restore at the bottom of the panel.
Restore is destructive. A confirmation prompt appears after you click Restore. Read it carefully — the target environment's current data will be wiped and replaced with the backup's contents. The progress page after confirmation shows the same Validate → Prepare → Run → Finalize stages we covered in Part 1's refresh workflow. A green banner confirms when the restore has finished, and the State returns to Ready.
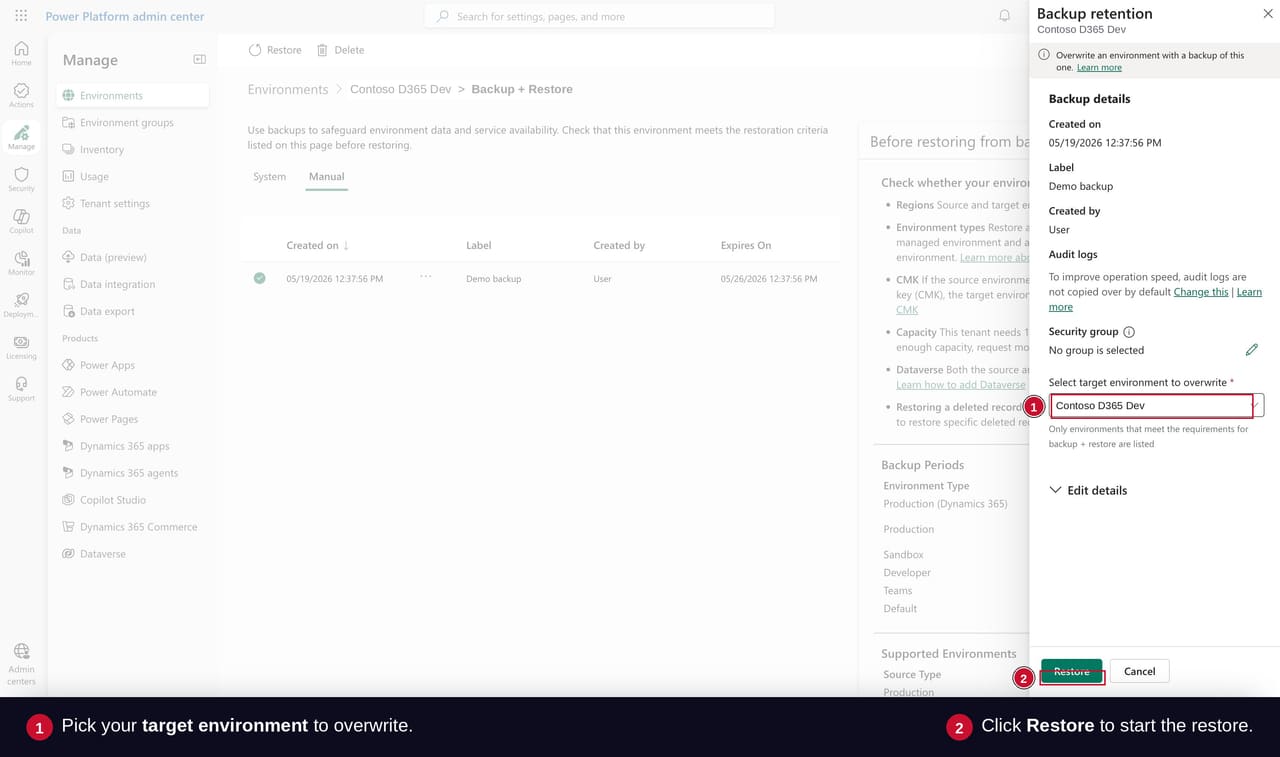 Figure 6: Backup retention dialog. Backup metadata (1) at the top, target environment dropdown (2) below, Restore button (3) at the bottom.
So far we have covered manual backups — snapshots you take yourself with a label. There is a second path: system backups, which Power Platform takes automatically every thirty minutes, retained for seven days. You can restore to any of those snapshots without having created anything beforehand. This is sometimes called point-in-time restore.
On the Backup + Restore page, switch to the System tab. The page shows:
Pick the date and the closest thirty-minute slot to the moment things were last known good. Then click Continue.
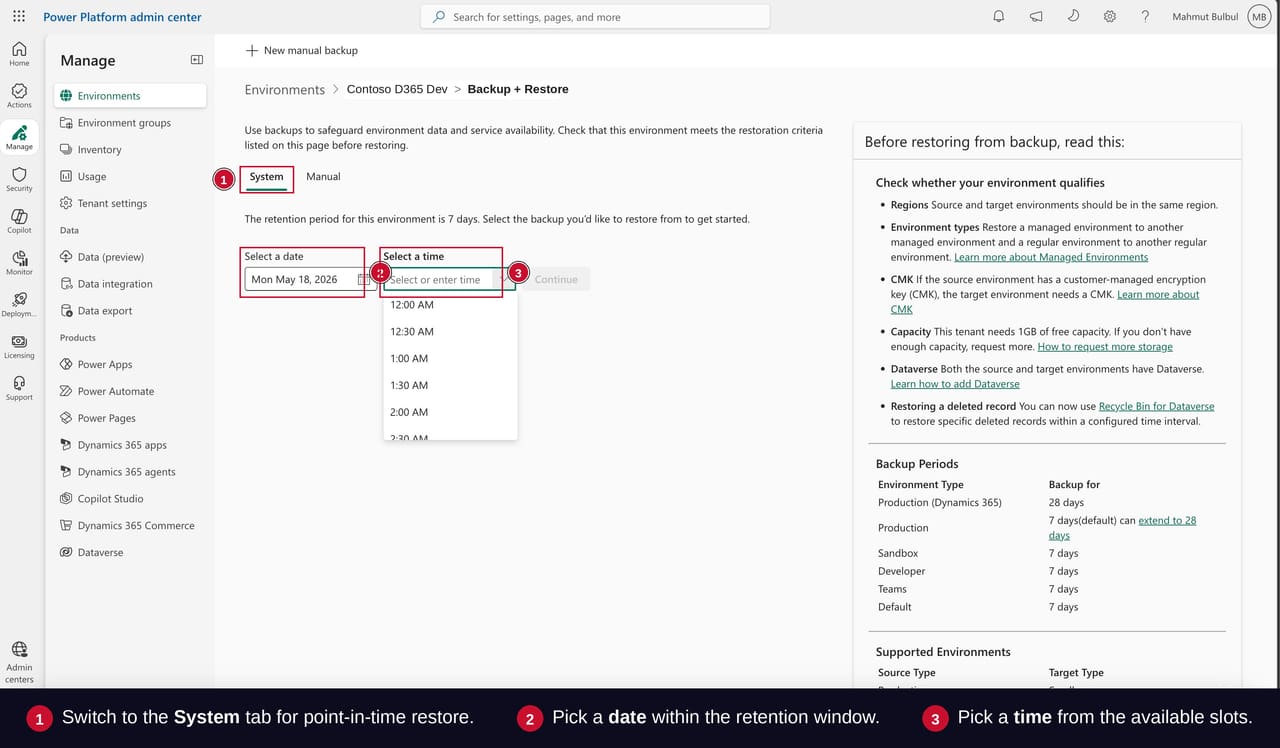 Figure 7: System tab — retention period (1), date picker (2), and 30-minute time slot dropdown (3) for point-in-time restore.
From here, the workflow is identical to the manual restore we just walked through in Steps 5 and 6. You will be taken to the same Backup retention panel, pick a target environment, click Restore, confirm the destructive overwrite, and let it run. The progress stages — Validate, Prepare, Run, Finalize — are the same. The completed environment will land in administration mode just like after a refresh; run through the same post-restore checklist before turning admin mode off.
Use point-in-time restore for unplanned failures. A bad commit, a corrupted import, an accidental delete — these are exactly the situations the automatic 30-minute backups exist for. Manual backups handle the planned cases; point-in-time restore handles the unplanned ones.
With both halves of the safety net in place — Part 1's refresh workflow and Part 2's backup-and-restore workflow — you have the complete UDE data management picture for Dynamics 365 Finance and Operations.
Write a backup discipline into your team's workflow — Before any destructive operation, take a labelled manual backup. Make it a checklist item, not a habit that depends on whoever happens to be paying attention.
Document your point-in-time restore procedure — When unplanned recovery is needed, the team should know within thirty seconds which tab to open, which date and time slot to pick, and which target to restore to. Write it down; do not rely on muscle memory in an outage.
Combine refresh and restore into a DR playbook — A real disaster-recovery story for F&O combines the workflows in both parts of this episode: refresh from production for routine data alignment, restore from backup for planned and unplanned rollback. Each has its place.
Subscribe to the Veriland UDE Tutorial Series — This guide is Episode 04, Part 02 of our ongoing D365 F&O UDE series. Upcoming tutorials cover variable groups for multi-environment promotion, source-controlled YAML pipelines, and zero-downtime promotion patterns from UDE to production.
Our ex-Microsoft consultants design UDE backup runbooks, restore procedures, and disaster-recovery playbooks that scale across multiple environments and teams — so your F&O programme has a real safety net, not just a wish.
Or call us directly: 01625 569 777