This tutorial walks through every click required to refresh a Unified Developer Experience (UDE) sandbox environment by copying data from another environment using the Power Platform Admin Center. By the end you will have an end-to-end refresh workflow — from identifying source and target, through the destructive overwrite, to the post-refresh tasks that often catch teams out.
The walkthrough uses fictional environments — Contoso D365 (Production) as the source, and Contoso D365 Dev as the target UDE — but the same workflow applies regardless of the tier you are refreshing into: Dev, UAT, SIT, or any other sandbox.
If you have not yet provisioned a UDE, start with our companion guide first: How to Set Up a Unified Development Environment (UDE) for Dynamics 365 Finance & Operations. And if you need to update the application version on the UDE before refreshing it, see How to Update a UDE Environment for D365 F&O.
A UDE sandbox is only as useful as the data inside it. Once it drifts away from production — once the schema differs, the master data is stale, or the integrations point at decommissioned endpoints — bugs reproduce against the wrong baseline and the team starts arguing about whose environment is "the real one." A clean periodic refresh keeps every UDE anchored to a known state.
A UDE refreshed from Production gives your developers the same customers, vendors, products, sales orders, and General Ledger postings the business actually uses. X++ extensions and report changes can be tested against realistic data volumes and edge cases, not the handful of demo records that ship with a fresh sandbox.
When a user reports a bug in Production, the fastest way to reproduce it is on an environment with the same data shape. A recently refreshed Dev UDE removes the "works on my machine" excuse: if the bug reproduces on the refreshed UDE and not on Production, the difference is in code, not data.
The same workflow lets you push UAT state into a developer UDE — useful for debugging issues raised by UAT testers against the exact data they were looking at. No more screenshot ping-pong; the developer can sign in and replicate the test scenario directly.
A scheduled monthly or quarterly refresh keeps every UDE in your environment chain aligned. Combined with administration mode and a written post-refresh checklist, the operation becomes routine — not an event that requires three people in a meeting room.
Open the Power Platform Admin Center. In the left-hand Manage menu, click Environments. You will see every environment your account has access to listed in a single table — Production, Sandbox, Default, and any UDEs your tenant has provisioned.
From this list, identify the two environments involved in your refresh:
UDE environments show Yes in the Managed column — that is how you distinguish them from regular sandboxes. In this walkthrough, Contoso D365 Dev is the target UDE, and Contoso D365 (a Production environment) is the source.
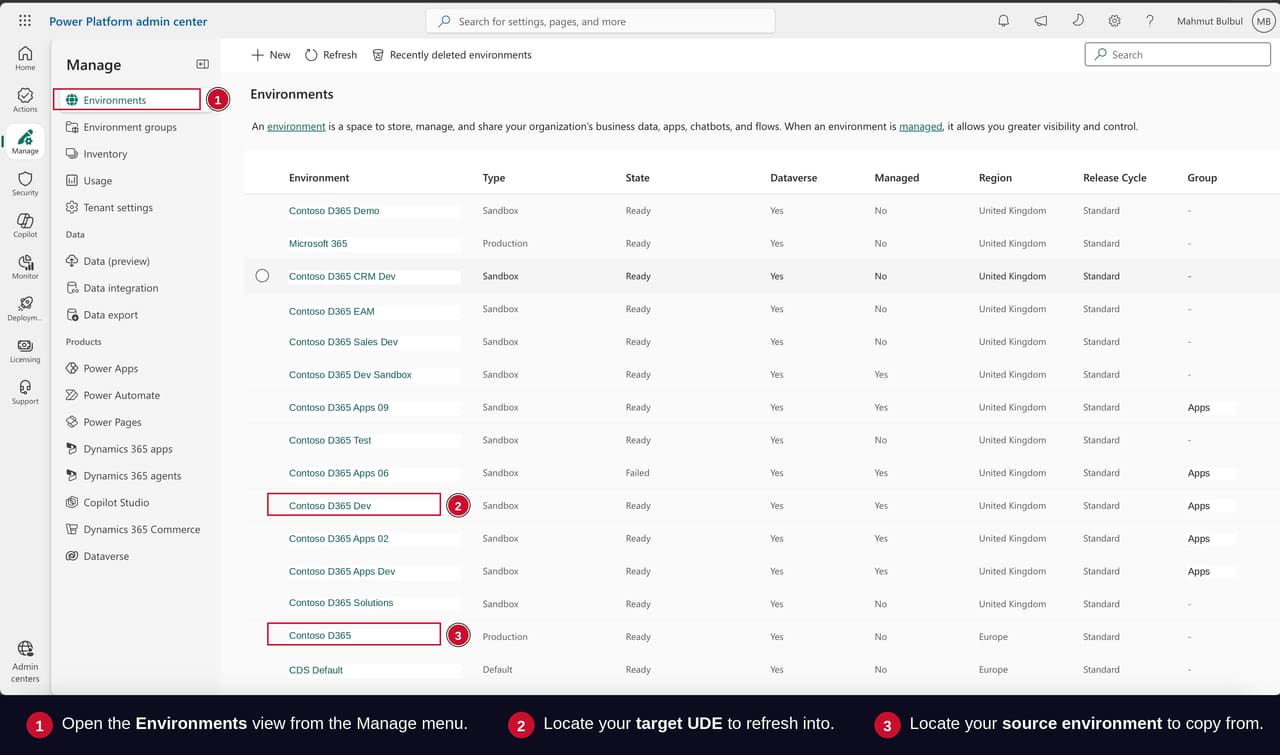 Figure 1: The Environments list in the Power Platform Admin Center. The target UDE (1) shows Yes under Managed; the source Production environment (2) is the data source.
Click into your target UDE to open its detail page. Before you do anything destructive, take a moment to confirm exactly what you are about to overwrite. Three values matter:
If any of these do not match what you expect, stop and check you are on the right environment. The cost of a wrong selection here is wiping the wrong sandbox — a five-second checklist saves a recovery exercise.
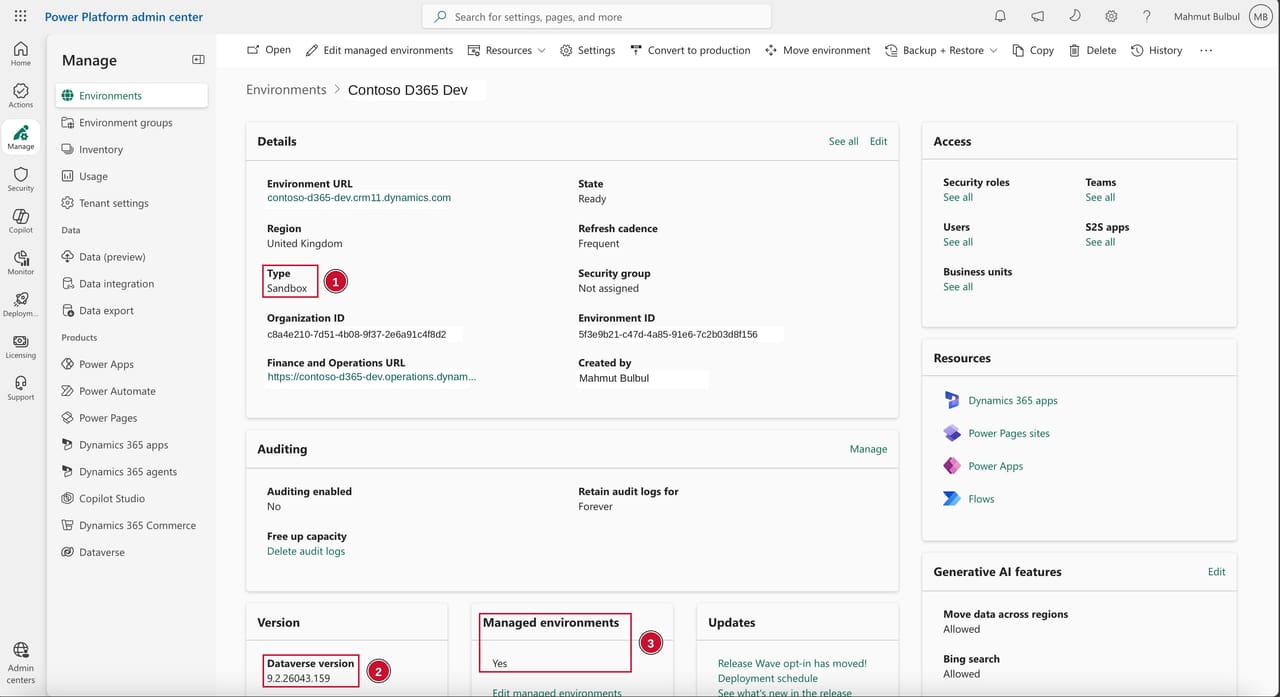 Figure 2: Target UDE detail page. Confirm Type (1), Dataverse version (2), and the Managed environments flag (3) before proceeding.
Go back to the environments list and click into the source. Confirm three things on its detail page:
A source that is mid-deployment, mid-upgrade, or in administration mode is not eligible for copy. If the State is anything other than Ready, wait for it to clear before initiating the operation.
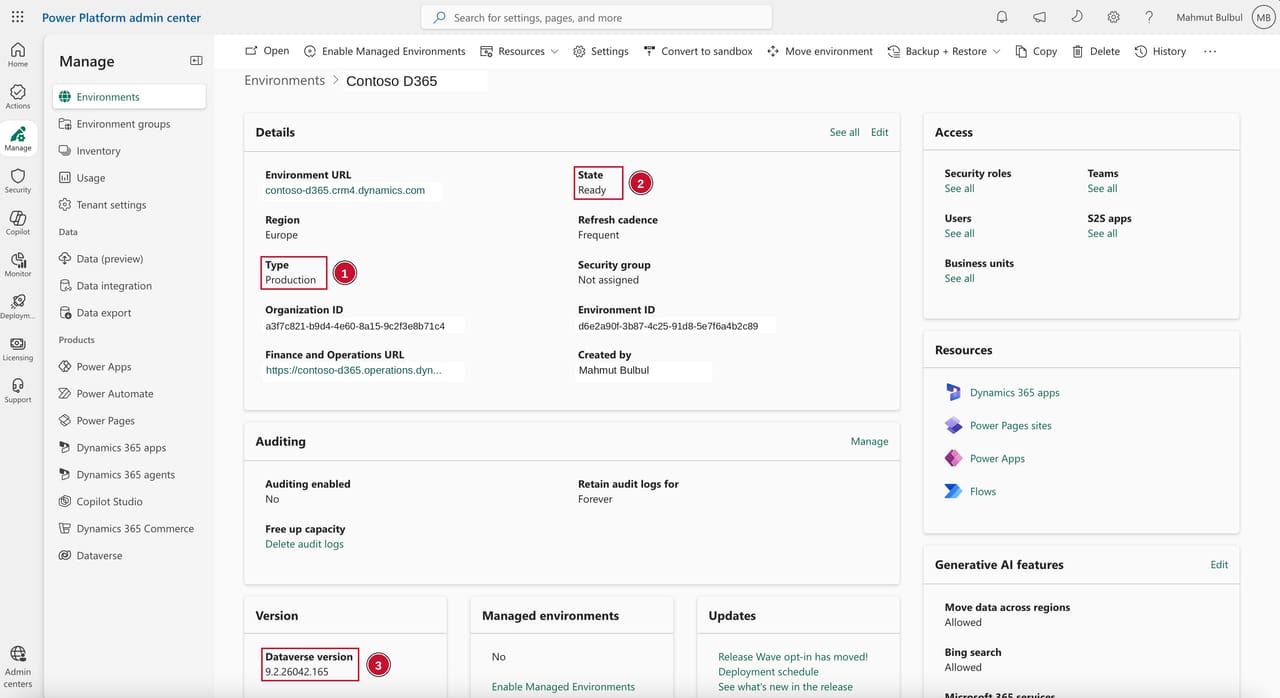 Figure 3: Source Production environment detail page. State (1) must be Ready before you can initiate the copy; confirm Type (2) and Dataverse version (3) at the same time.
From the source environment's detail page, click Copy in the toolbar at the top of the page. The Copy environment dialog opens on the right.
Work through the two fields top to bottom:
Copy over — leave Everything selected. This brings across all application data, customisations, and schemas, which is what you want for a true refresh. The alternative — Customisations and schemas only — copies the metadata without the underlying data and is rarely what F&O teams want.
Select target environment to overwrite — pick your target from the dropdown. In this walkthrough that is Contoso D365 Dev.
Once both fields are configured, click Copy at the bottom of the dialog.
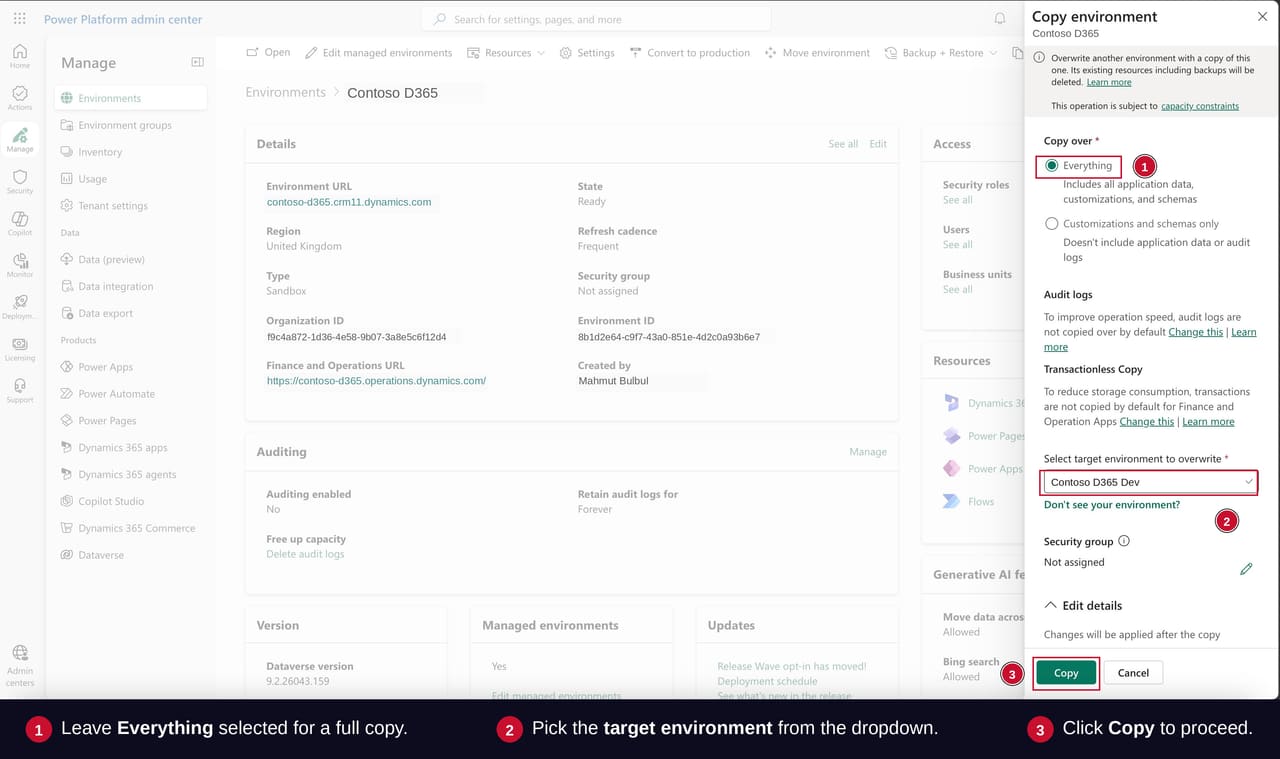 Figure 4: Copy environment dialog. Everything selected (1), target chosen (2), ready to proceed (3).
A confirmation prompt appears. It warns that the target environment's data will be completely deleted and replaced with the source's data. This is irreversible — once you click Confirm, the target's current state is gone.
Read the prompt carefully. Confirm one last time that you have selected the right target. Then click Confirm to proceed.
The overwrite is destructive and cannot be undone. If the target UDE has any in-progress X++ work that has not been committed to source control, any unsaved configuration changes, or any unique data not present in the source, recover it before clicking Confirm. Power Platform's automated backups exist but are designed for disaster recovery — not ad hoc rollback after an operator mistake.
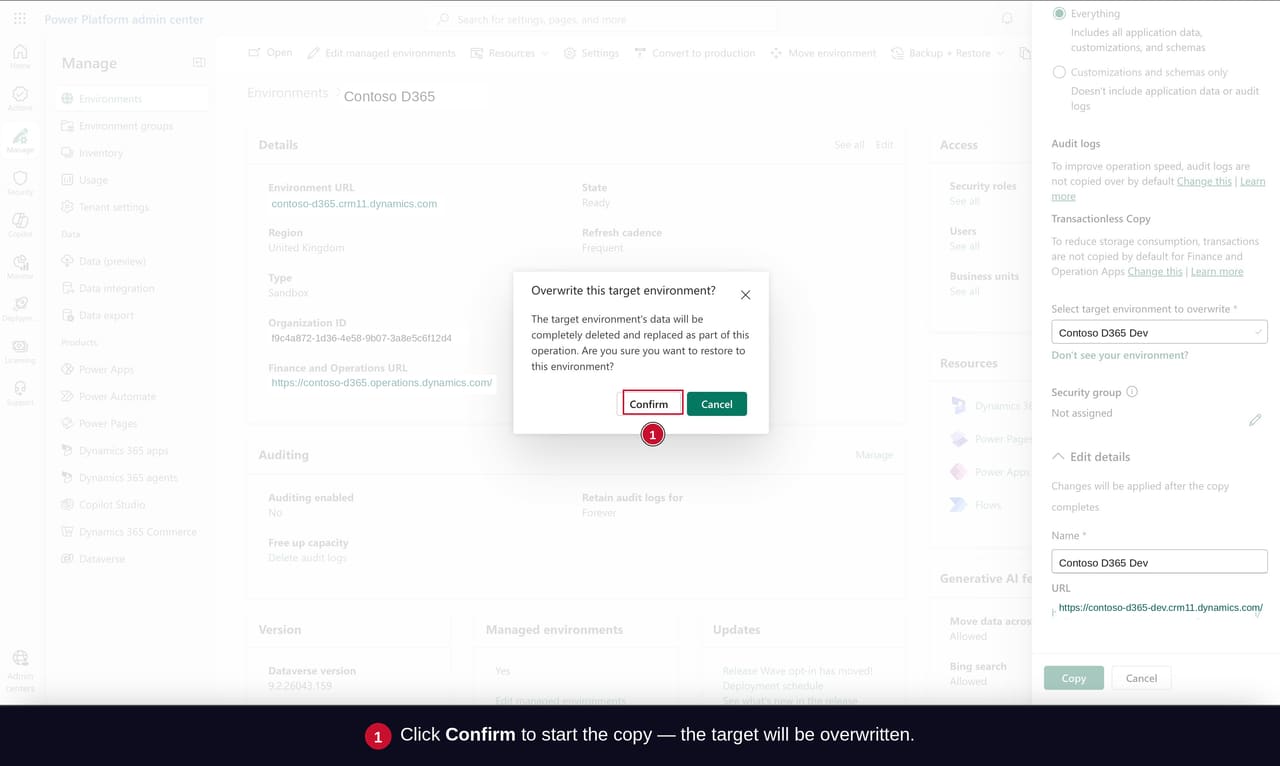 Figure 5: The confirmation prompt. Last chance to stop before the target is wiped — read it, then click Confirm.
A yellow status banner appears at the top of the target's detail page confirming the operation is in progress, with the timestamp the copy started. Below it, the Copy details panel shows four sequential steps that turn green as each one completes:
You do not have to stay on this page. The copy continues in the background, and you can return to it at any time by navigating back to the target environment's detail page.
A typical copy takes anywhere from 30 minutes to a few hours, depending on the volume of data being moved. Production datasets above 50 GB of Dataverse storage typically sit at the upper end of that range. Plan the refresh window accordingly — and avoid scheduling it across a maintenance event on the source.
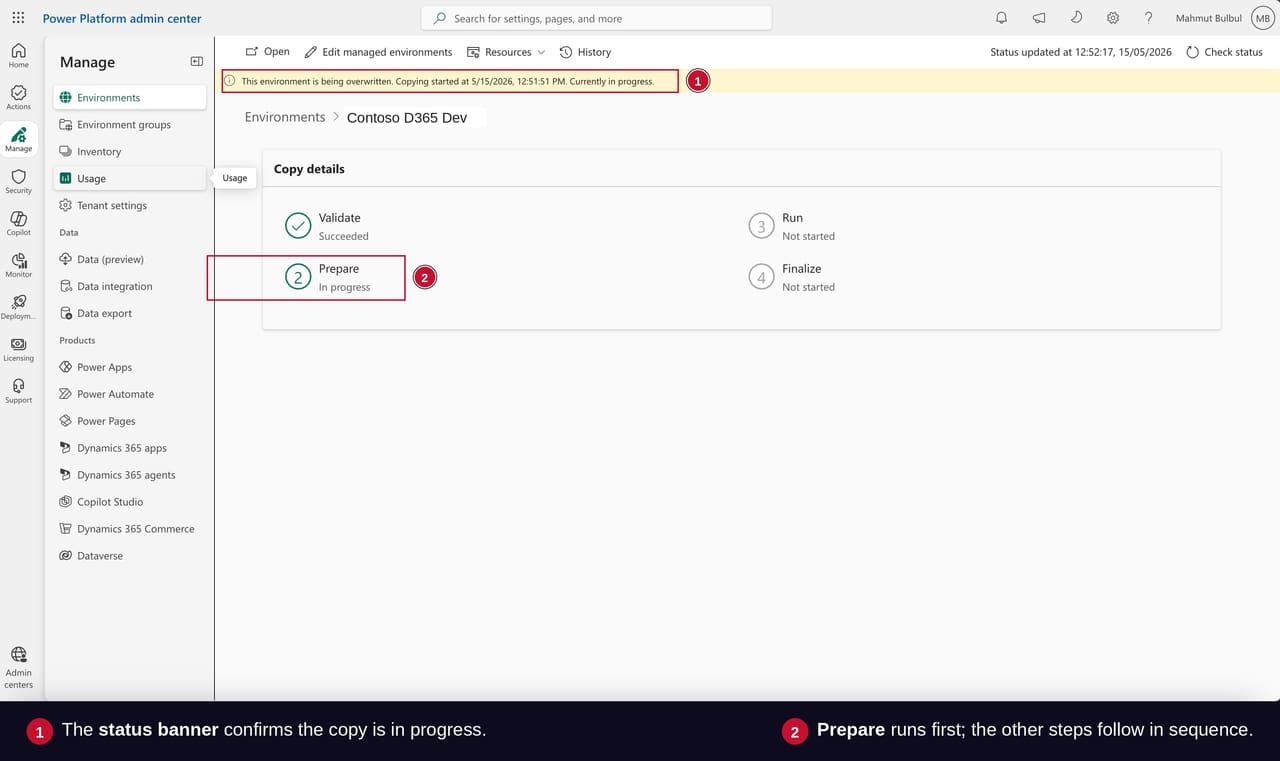 Figure 6: Copy in progress. Validate is complete (1), Prepare is current (2), Run and Finalize are queued. Status banner (3) shows the operation start time.
When the copy finishes, a green banner confirms success with a timestamp, and the State returns to Ready. But you are not quite done.
By default, the refreshed environment is placed into administration mode — only administrators can sign in. A yellow notice on the environment page reminds you of this state. Administration mode exists for a reason: it gives you a window to run post-refresh tasks before regular users hit a half-configured environment.
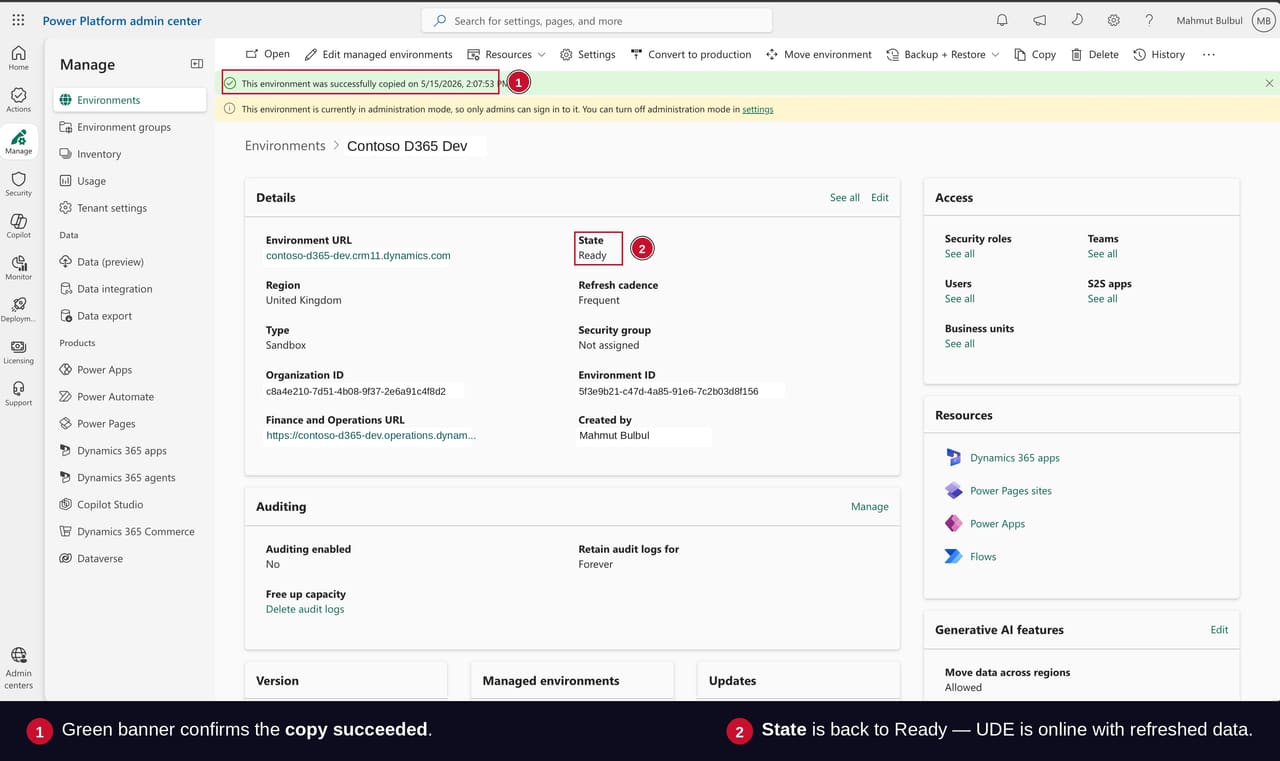 Figure 7: Copy completed. Green success banner (1), State back to Ready (2), administration mode reminder (3).
Run through these post-refresh tasks before turning off administration mode:
Re-enable any batch jobs you disabled before the refresh. Batch jobs typically come across in a disabled or withholding state. Walk the list in System Administration → Inquiries → Batch jobs and re-enable the ones the business expects.
Reapply integration secrets and connection strings that did not survive the copy. API keys, service principal credentials, OAuth tokens, and SMTP relay passwords frequently come across blanked or stale. Validate each integration explicitly.
Run a smoke test on a few key records. Pick a customer, a vendor, a product, and a sales order. Confirm they look right and that the related transactions are present. Five minutes of manual checks catches most copy-data issues before users do.
Validate user-specific data tied to environment identity. Queue ownership, security role memberships, and personalisation settings sometimes need realignment after a copy — especially when source and target tenants differ.
Turn off administration mode in the environment settings only once the above checklist is complete. The environment is then live for regular users.
Post-refresh tasks usually take longer than the copy itself. Plan accordingly when scheduling a refresh into a shared environment — the copy is the easy part; the post-refresh runbook is where teams without a written checklist lose time.
With your UDE refreshed and back in service, a few directions to take it next:
Write down your post-refresh runbook — Capture every step your team runs after a copy operation. Without this, the work falls on whoever happens to be online when the next refresh completes, and the institutional memory walks out the door with them.
Schedule recurring refreshes — A monthly or quarterly cadence keeps every UDE anchored to a known production baseline. Combined with administration mode and a written checklist, the operation becomes routine.
Coordinate refreshes with the team using the target — A shared UDE wiped without warning costs a developer half a day. Announce refresh windows in advance and confirm there is no uncommitted X++ work on the target before initiating the copy.
Move on to Part 2 — Manual Backup and Restore — Where we look at backing up a UDE manually and restoring from a specific point in time, useful when you want a controlled snapshot rather than a full overwrite from another environment.
Subscribe to the Veriland UDE Tutorial Series — This guide is Episode 04, Part 01 of our ongoing D365 F&O UDE series. Upcoming tutorials cover backup and restore, variable groups for multi-environment promotion, and source-controlled YAML pipelines.
Our ex-Microsoft consultants design UDE refresh runbooks, post-refresh automation, and managed environment workflows so your team spends less time on plumbing and more time shipping X++ code.
Or call us directly: 01625 569 777